Hello everyone. Previous my articles were Reactive Programming in Game Development: Specifics of Unity and Developing Games on Unity: Examining Approaches to Organizing Architecture.
Today I would like to touch upon such a topic as rendering and shaders in Unity. Shaders (in simple words) are instructions for video cards that tell them how to render and transform objects in the game. So, welcome to the club, buddy.
Caution! This article was a kilometer long, so I divided it into two parts!
How does rendering in Unity work?
In the current version of Unity, we have three different rendering pipelines – Built-in, HDRP, and URP. Before dealing with rendering, we need to understand the concept of the rendering pipelines that Unity offers us.
Each rendering pipeline performs some steps that perform a more significant operation and form a complete rendering process. And when we load a model (for example, .fbx) onto the stage, before it reaches our monitors, it goes a long way, as if traveling from Washington to Los Angeles on different roads.
Each rendering pipeline has its properties that we will work with. Material properties, light sources, textures, and all the functions inside the shader will affect the appearance and optimization of objects on the screen.

So, how does this process happen? For that, we need to discuss the basic architecture of rendering pipelines. Unity divides everything into four stages: application functions, working with geometry, rasterization, and pixel processing.
Application functions
The processing of the functions starts on the CPU and takes place within our scene. This can include:
- Physics processing and collision miscalculation
- Texture animations
- Keyboard and mouse input
- Our scripts
This is where our application reads the data stored in memory to further generate our primitives (triangles, vertexes, etc.). At the end of the application stage, all this is sent to the geometry processing stage to work on vertex transformations using matrix transformations.
Geometry processing
When the computer requests through the CPU from our GPU the images we see on the screen, this is done in 2 stages:
- When the render state is set up, and the steps from geometry processing to pixel processing have been passed
- When the object is rendered on the screen
The geometry processing phase takes place on the GPU and is responsible for processing the
vertexes of our object. This phase is divided into four sub-processes: vertex shading, projection, clipping, and display on the screen.
When our primitives have been successfully loaded and assembled in the first application stage, they are sent to the vertex shading stage. It has two tasks:
- Calculate the position of the vertexes in the object
- Convert the position to other spatial coordinates (from local to world coordinates, as an example) so that they can be rendered on the screen
Also, during this step, we can additionally select properties that will be needed for the next steps of drawing the graphics. These include normals, tangents, as well as UV coordinates, and other parameters.
Projection and clipping work as additional steps and depend on the camera settings in our scene. Note that the entire rendering process is done relative to the Camera Frustum.
The projection will be responsible for perspective or orthographic mapping, while clipping allows us to trim excess geometry outside the Camera Frustum.
Rasterization and work with pixels
The next stage of rendering work is rasterization. It consists in finding pixels in our projection that correspond to our 2D coordinates on the screen. The process of finding all the pixels that are occupied by the screen object is called rasterization. This process can be considered a synchronization step between the objects in our scene and the pixels on the screen.

The following steps are performed for each object on the screen:
- Triangle Setup is responsible for generating data on our objects and transmitting it for traversal.
- Triangle Traversal enumerates all pixels that are part of the polygon group; in this case, this group of pixels is called a fragment.
The last step follows when we have collected all the data and are ready to display the pixels on the screen. At this point, the fragment shader is launched, which is responsible for the visibility of each pixel. It is responsible for the color of each pixel to be rendered on the screen.

Forward and deferred shading
As we already know, Unity has three types of rendering pipelines: Built-In, URP, and HDRP. On one side, we have Built-In (the oldest rendering type that meets all Unity criteria). Conversely, we have the more modern, optimized, and flexible HDRP and URP (called Scriptable RP).

Each rendering pipeline has its paths for graphics processing, which correspond to the set of operations required to go from loading the geometry to rendering it on the screen. This allows us to graphically process an illuminated scene (e.g., a scene with directional light and landscape).
Examples of rendering paths include forward path, deferred path, and legacy deferred and legacy vertex lit. Each supports certain features and limitations, having its performance.
In Unity, the forward path is the default for rendering. This is because the largest number of video cards supports it. But the forward path has its limitations on lighting and other features.

Note that URP only supports the forward path, while HDRP has more choices and can combine both forward and deferred paths.
To better understand this concept, we should consider an example where we have an object and a directional light. How these objects interact will determine our rendering path (lighting model).
Also, the result will be influenced by:
- Material characteristics
- Characteristics of the lighting sources
The basic lighting model corresponds to the sum of 3 different properties: ambient color, diffuse reflection, and specular reflection.
The lighting calculation is done in the shader. It can be done per vertex or fragment. When lighting is calculated per vertex, it is called per-vertex lighting and is done in the vertex shader stage. Similarly, if lighting is calculated per fragment, it is called per-fragment or per-pixel shader and is done in the fragment (pixel) shader stage.

Vertex lighting is much faster than pixel lighting, but you must consider that your models must have many polygons to achieve a beautiful result.
Matrices in Unity
So, let’s return to our rendering stages, more precisely to the stage of working with vertexes. Matrices are used for their transformation. A matrix is a list of numerical elements that obey certain arithmetic rules and are often used in computer graphics.
In Unity, matrices represent spatial transformations. Among them, we can find:
- UNITY_MATRIX_MVP
- UNITY_MATRIX_MV
- UNITY_MATRIX_V
- UNITY_MATRIX_P
- UNITY_MATRIX_VP
- UNITY_MATRIX_T_MV
- UNITY_MATRIX_IT_MV
- unity_ObjectToWorld
- unity_WorldToObject
They all correspond to four-by-four (4×4) matrices. Each matrix has four rows and four columns of numeric values. An example of a matrix can be the following option:

As was said before – our objects have two nodes (in some graphic editors, they are called transform and shape), and both are responsible for the position of our vertexes in object space. The object space defines the position of the nodes relative to the center of the object.
And every time we change the position, rotation, or scale of the vertexes of the object, we multiply each vertex by the model matrix (in the case of Unity – UNITY_MATRIX_M).
To transfer coordinates from one space to another and work within it, we will constantly work with different matrices.
Properties of polygonal objects
Continuing the theme of working with polygonal objects, I can say that in the world of 3D graphics, every object is made up of a polygon mesh. The objects in our scene have properties; each always contains vertices, tangents, normals, UV coordinates, and color. All together form a mesh. This is all managed by shaders.

With shaders, we can access and modify each of these parameters. We will usually use vectors (float4) when working with these parameters. Next, let’s analyze each of the parameters of our object.
Vertices
The vertices of an object correspond to a set of points that define the surface area in 2D or 3D space. In 3D editors, vertices are usually represented as intersection points between the mesh and the object.
Vertices are characterized, as a rule, by 2 points:
- They are child components of the transform component
- They have a certain position according to the center of the common object in the local space
This means that each vertice has its transform component responsible for its size, rotation, and position, as well as attributes that indicate where these vertices are relative to the center of our object.
Normals
Normals inherently help us determine where the face of our object slices are located. A normal corresponds to a perpendicular vector on the surface of a polygon, which is used to determine the direction or orientation of a face or vertex.

Tangents
Referring to the Unity documentation, we get the following description:
A tangent is a unit-length vector that follows Mesh surface along horizontal (U) texture direction. Tangents in Unity are represented as Vector4, with x,y,z components defining the vector, and w used to flip the binormal if needed – Unity Manual
What the hell did I just read? In simple language, tangents follow U coordinates in UV for each geometric shape.

UV coordinates
Many guys have looked at the skins in GTA Vice City and maybe, like me, even tried to draw something of their own. And UV coordinates are exactly related to this. We can use them to place a 2D texture on a 3D object.
These coordinates act as reference points that control which texels in the texture map correspond to each vertex in the mesh.

The area of UV coordinates equals a range between 0.0 (float) and 1.0 (float), where “0” represents the start point and “1” represents the endpoint.
Vertex colors
In addition to position, rotation, and size, vertices also have their colors. When we export an object from 3D software, it assigns a color to the object that needs to be affected by lighting or copying another color.

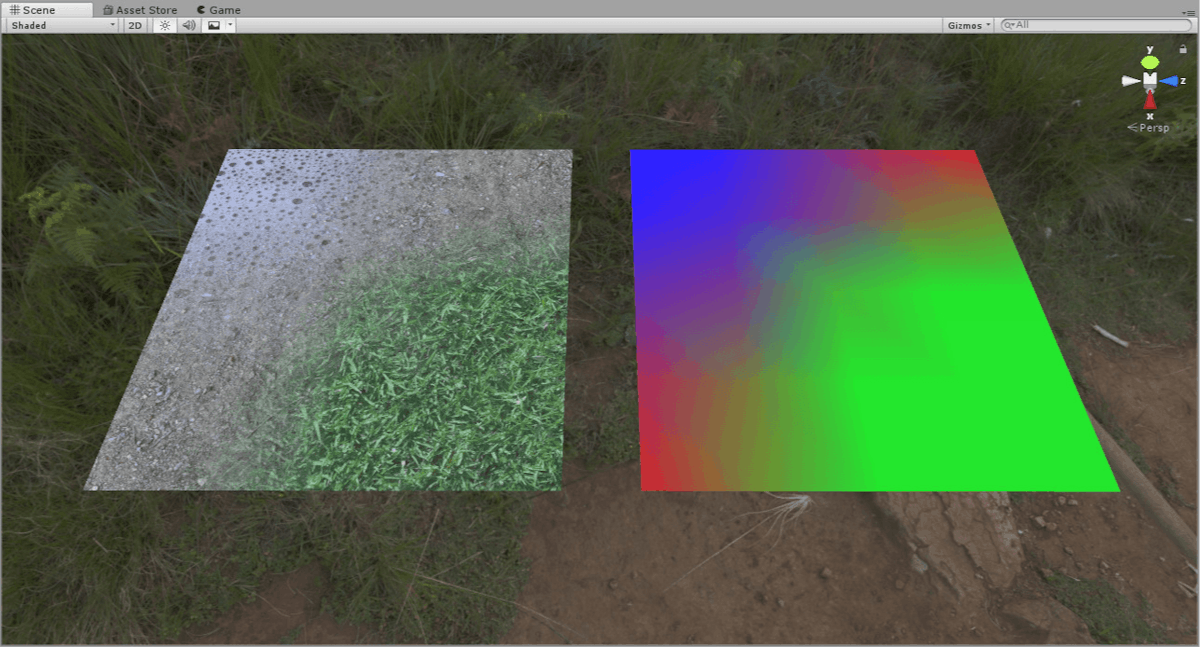
The default vertex color is white (1,1,1,1,1,1), and colors are encoded in RGBA. With the help of vertex colors, you can, for example, work with texture blending, as shown in the image above.
Small conclusion
This is the end of the 1 part. In the 2 part, I will discuss:
- What is a shader
- Shader languages
- Basic shader types in Unity
- Shader structure
- ShaderLab
- Blending
- Z-Buffer (Depth-Buffer)
- Culling
- Cg/HLSL
- Shader Graph
If you have any questions, leave them in the comments!
The Unity Writing Contest is sponsored by Tatum Games. Power your games with MIKROS – a SaaS product that enrolls game developers in an information-sharing ecosystem, also known as data pooling, that helps identify better insights about user behavior, including user spending habits.
This article was originally published by Zhurba Anastasiya on Hackernoon.


